How to install a Sony CDX-DAB700U car radio in a Vauxhall Corsa D
Introduction
I like listening to podcasts and DAB radio (particularly the BBC World Service) whilst driving. The Vauxhall Corsa standard fit CD30 radio unfortunately gives me neither of those options. I therefore decided to install an aftermarket radio. Having some time on my hands, I thought I would try this myself rather than pay someone to do it for me. Cue a world of difficulty. Although the job itself was not technically demanding, finding out what parts I needed and how to do it was a lot more effort than I thought it would be. Two different car audio retailers gave me the wrong advice about what parts I needed and Vauxhall's line was:
As a manufacturer we would not recommend changing the specification of vehicle, If any modifications are made and a fault occurs to the vehicle which could be attributed to these modifications, this could affect the warranty on the vehicle.
To be fair to Vauxhall the query I did ask them was answered promptly, politely and in full; the above was legalese I suspect they stick into all their emails.
I therefore thought once I'd done the job, I'd put up a guide on line to assist others in a similar situation. Enjoy. Hope it helps. It is worth adding, I have no technical expertise in or love of either cars or audio systems, if you are going to follow this advice bear that in mind.
Parts
Here is what you will need before you start:
Sony CDX-DAB700U car radio. Obviously. This comes with or without an internal windscreen-mounted DAB aerial. I chose the option that came with; it is possible to connect the radio to your regular aerial, but this is a whole level of technical expertise above what I possess (you also need to have an non-amplified aerial, the Corsa D has an amplified aerial as standard adding more complexity to this option). It also contains a wiring harness which converts the Sony 16 pin connection to an ISO 10487 connection.
Autoleads PC2-85-4 Wiring Harness with Fakra Aerial Adaptor. This wiring harness connects the Vauxhall Quadlock connector to the ISO 10487 end of the Sony supplied harness. In addition the version of this harness I bought also had a Fakra Aerial Adaptor wired in (I believe it is possible to buy a PC2-85-4 without this attached, in which case I think you will also then have to separately purchase a PC5-137 Car Audio Aerial Adaptor Lead for Fakra to DIN). This connects the Fakra aerial lead in the Vauxhall to the Sony DIN aerial, it also provided power for the aerial from the Sony ISO connector (more on this later at step 9).
Autoleads FP-19-01/SS fascia adaptor (the SS stands for Shiny Silver, but your colour scheme could be different). The CD30 is a double DIN radio, the Sony a single DIN (i.e. it is half the size), therefore an adaptor is required to hold it in place in the center console. See the wikipedia article on ISO 7736 for more on radio sizes.
A pair of plyers (I used an old Leatherman). Not essential, but useful for the fiddly bits.
A small, flat-head screwdriver. Again not essential, but useful for things like loosening prongs.
NB - The links above are Amazon or Ebay 'affiliate' links so if you were to buy after following the link then I would receive a very small amount of money. This money is used to contribute to the costs of hosting this site, but does not influence the content in any other way.
Instructions
Remove the CD30 radio.
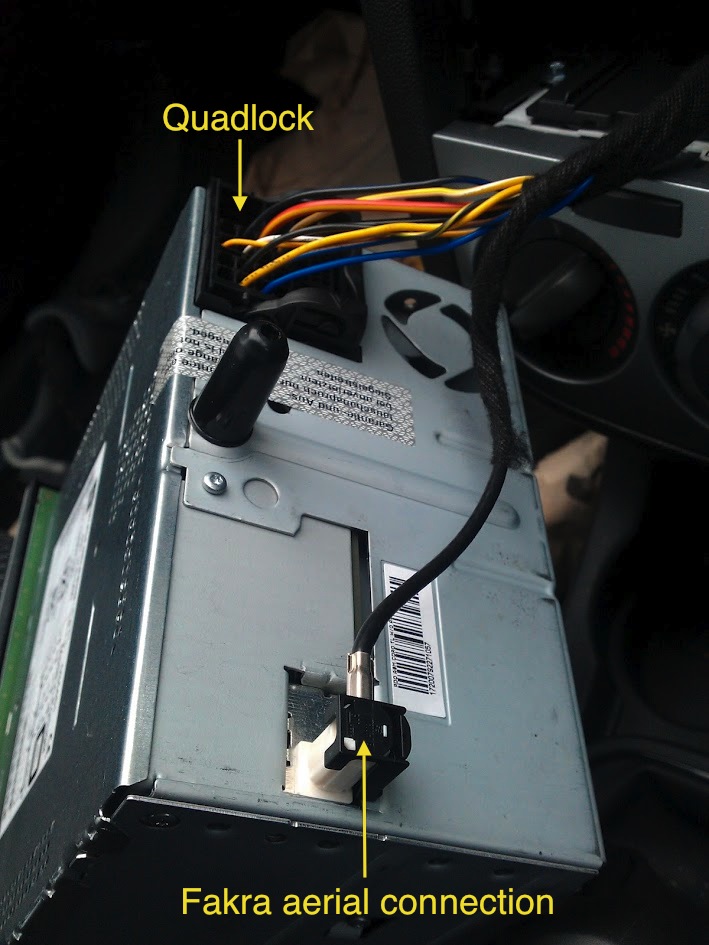
To do this insert the PC5-110 keys into the 4 holes on the corners of the stereo. I was surprised at how deep the key had to go in and tried to remove the radio unsuccesfully several times when the keys were only half way in. Ensure you get the keys all the way in before pulling - it helps greatly if you wiggle the keys as you push, allowing one side of the key to get in, and then the other. There is a youbtube video of a man removing a CD30 radio. The video is only helpful for the removal element however as the rest of his attempt to install the radio doesn't work out. Once you have removed the CD30 then two wires will be trailing from it: the Quadlock connector (the large square connector) and the Fakra aerial connector:
Rear of CD30
Unplug the Quadlock connector and the Fakra aerial connector.
To remove the Quadlock squeeze the locking tab by the retaining lever and swing the retaining lever up. The aerial connector also has a latch that needs to be released.
Remove the CD30 bracket.
The bracket is a piece of metal which the CD30 slots into. Use your screwdriver to help release any prongs holding it in place and slide it out. Once you have got it out, it looks like this:
CD30 bracket or cage
Switch the power wires on the Sony wiring harness.
Ok, this is where the less technically minded are going to get a bit anxious. Essentially we now need to follow the procedure outlined in the Power connection diagrams in the radio's installation guide to get from diagram a to diagram c:
How the Sony harness looks on unboxing:How we need the Sony harness to look:
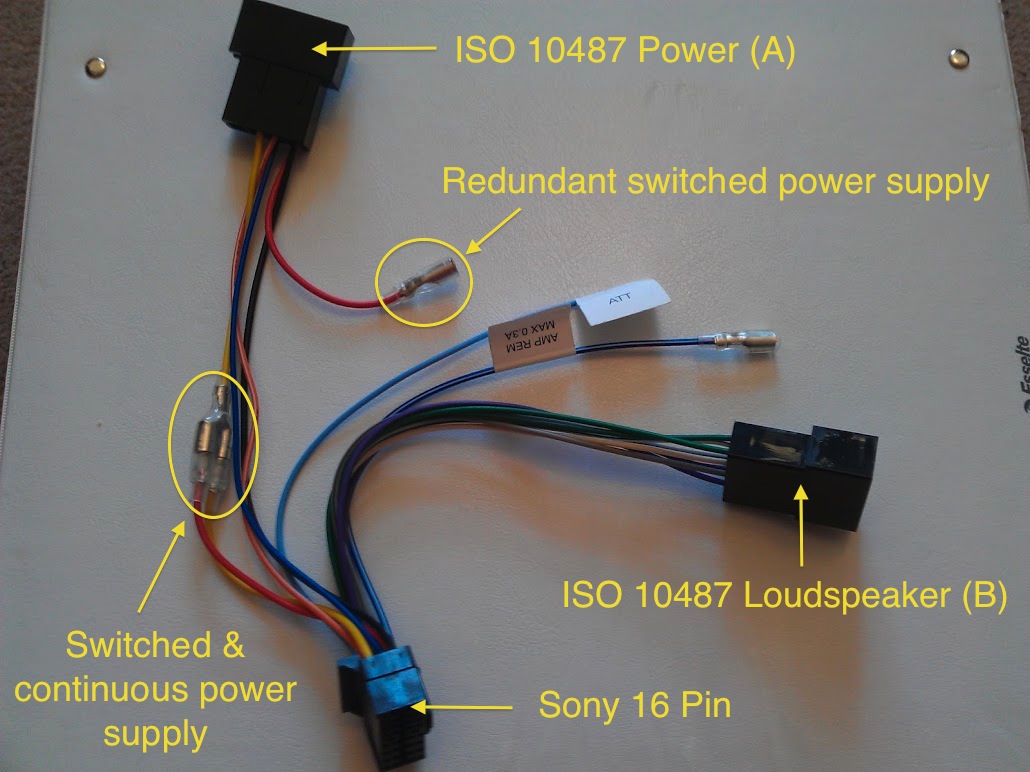
When the Sony wiring harness is taken out of the box the red wire from the Sony 16 pin connector connects to the red wire leading into the ISO 10487 Power (A) connector and the yellow wire does likewise. However this connection will not work for the Vauxhall Corsa D. Therefore using your plyers remove the red wire out of the connector (pulling on the metal not the wire) and insert the red male connector into the empty female yellow connector as above. Now you have the yellow wire from the ISO 10487 Power (A) connector running into both the yellow and red wires from the Sony 16 pin plug.
Here is how this looks for real when the wires have been switched:
Sony supplied wiring harness
It might actually be an idea to start with this step first, so you can do it on your kitchen table rather than cramped up in your car. But I didn't want to scare anyone by this guide launching straight into the technical bit.
Feed the Sony DAB aerial into the console.
The Sony DAB aerial is glued in place on the inside of the windscreen, once it is there, it is there for good, so I'd suggest you don't actually stick it in place until you are happy.
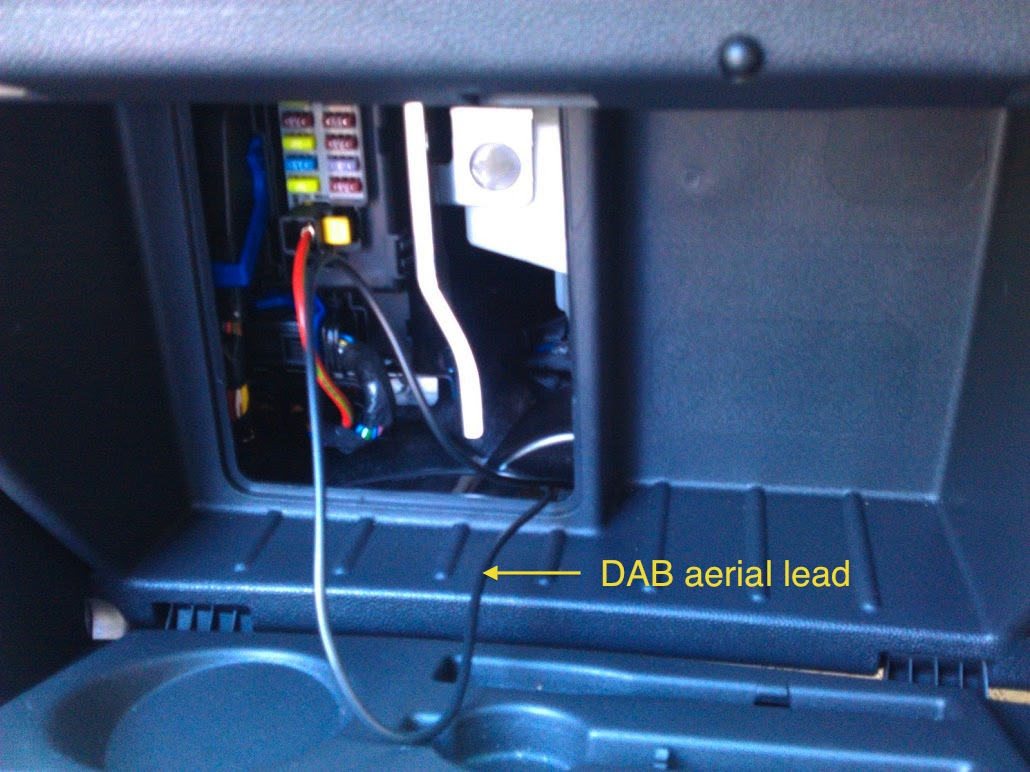
With that in mind place the aerial on the dashboard near where you eventually intend to glue it. Open the glovebox and remove the plastic covering over the fusebox. Feeling for some holes under the glovebox and using the void where the fuses are thread the aerial wire behind your glovebox and into the centre console. Here I am half way through this:
Interior of glovebox with fuse void space open and Sony DAB aerial being pulled through.
This should be a relatively pain free step.
Insert the Autoleads FP-19-01/S fascia adaptor into the console.
This should slide into place and there are some clips on the upperside of the fascia which should fasten into the centre console.
Remove the Sony metal bracket from the radio and slide it into the fascia.
The procedure laid out in diagrams 4 and 5 of the installation guide should be followed to remove the bracket from the radio, which should then be slid into the fascia adapter you inserted in the above step.
Around the edge of the bracket are prongs or claws which should be bent down/up with a screwdriver or similar so that the radio is held firmly in place when it is eventually placed in the bracket.
Connect the DAB aerial.
Connect the Sony DAB aerial lead, which you wired into the console in step 5, into the port on the back of the radio. Easy.
Connect the non-DAB aerial.
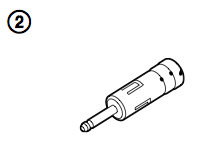
Sony supply with the radio an aerial adapter, listed in the manual as Part 2, illustrated here:
Place this to one side as it will not be required.
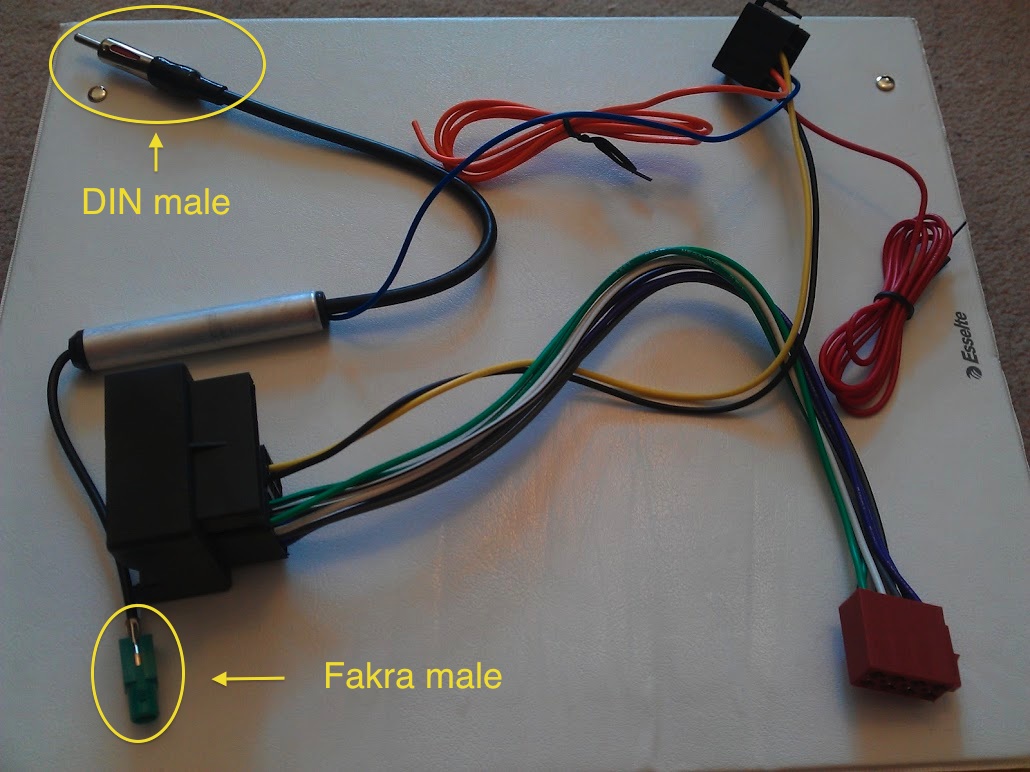
The Autoleads PC2-85-4 Wiring Harness with Fakra Aerial Adaptor has a number of different connections on it: three for the wiring harness (namely the Quadlock and ISO Connectors) and two for the aerial (namely a DIN male and a Fakra female). The aerial connectors are shown below:
Autoleads PC2-85-4 Wiring Harness with Fakra Aerial Adaptor
Connect the DIN male into the Sony radio and the Fakra male into the Vauxhall's Fakra female. NB - The Fakra connection has a clip on it to secure the two connectors together, once I'd connected them the clip was so tight that I wasn't able to remove it without accidentally breaking the clip. This wasn't a problem as the connection was still secure, and this was probably just me being cack-handed, but you would want to be aware that once connected it is awkward to disconnect.
Connect the PC2-85-4 Quadlock to the Vauxhall Quadlock connector.
You will need to lower the lever on the Vauxhall Quadlock to get them to connect firmly.
Connect the Sony harness to the radio and then to the PC2-85-4 ISO Connectors.
The Sony 16 Pin connector by the way once in, is very difficult to get out. I tried do so, broke some of the plastic and then decided it is probably best in place!
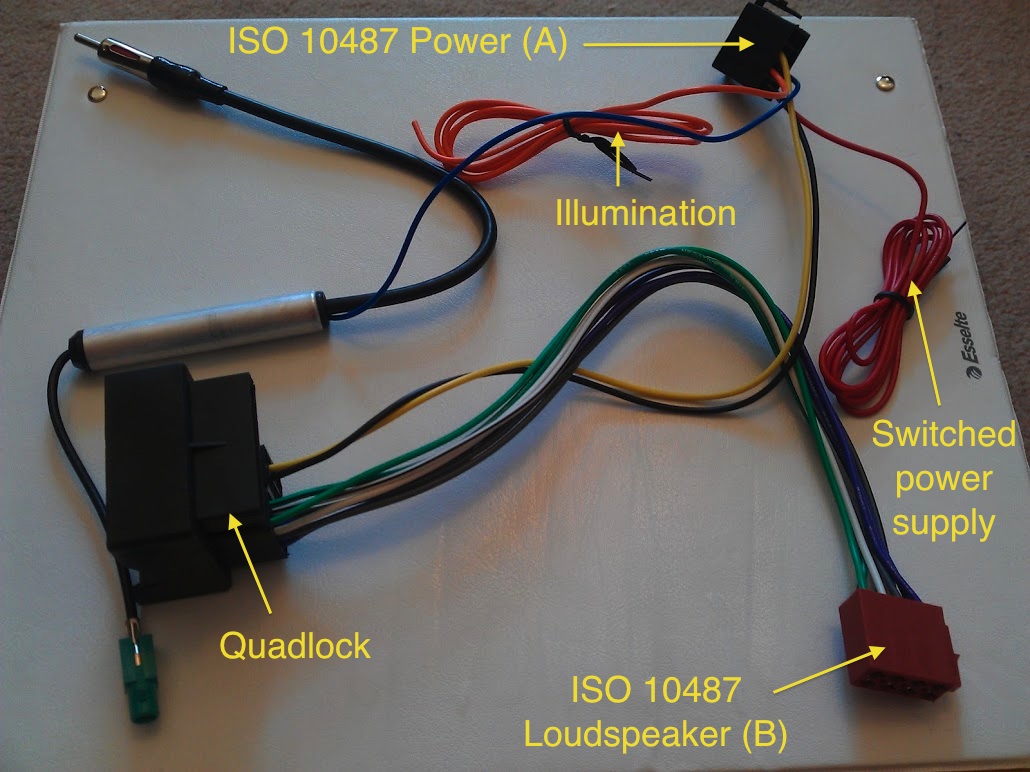
I would suggest you connect the black ISO 10487 Power (A) connector last; as you probably want all other connections made before you supply it with power. The PC2-85-4 ISO Connectors and Quadlock are labelled below:
Autoleads PC2-85-4 Wiring Harness with Fakra Aerial Adaptor
Check it works!
Now for the fun part. Attach the front panel and if everything has gone to plan the panel should light up and noise should emanate from your speakers. Now would be a good time to test it in all respects: DAB, FM, CD, iPod. If something isn't working you are only going to have to take it all out again, so best make sure.
Push the radio into the bracket and fit the protection collar.
It is a good idea to remove the front panel before pushing it in, just to prevent scratches. When the radio is all the way into the bracket it clicks into place. The protection collar fits over the top of the radio. As described in diagrams 5 and 6 in the installation guide. The guide also refers to attaching the radio to the "firewall," I didn't do this, again beyond my ken.
Power on and enable Auto Off.
Due to the continuous / switched power issue we covered at step 4, we need to to make sure that the Auto Off function is enabled. This will ensure that the radio powers down when switched off so it does not drain your battery. Instructions for this can be found on page 25 of the manual under the heading "Adjusting setup items." Probably a good idea to attach the front panel and do this now before you forget...
Conclusion
And we're done. I'll let you glue the aerial in place yourself. I hope this has been useful.
As for the Sony CDX-DAB700U itself, I like it. I was annoyed at first that my particular iPod (Classic fifth generation with video) is not fully supported, which basically means that to change a podcast I have to unplug it, find the podcast I want and plug it in again. Although it is a pretty easy fix around so I can't get too worked up about it. Unfortunately the USB connection does not work with later Android smartphones - which is what I now use for podcasts - the USB still charges the phone but you will need an Aux wire for audio; not elegant but it works. My next radio will have bluetooth as that seems a much better way of doing this. As for the DAB reception; it is very dependent on what part of the country you are in. I think if you really want the DAB part of this to be one hundred percent you will need an external aerial. The sound quality seems good (though I'm no audiophile).
Contact
My entire sum of knowledge as regards car radios and installing them is contained on this page, so please don't contact me to ask any addtional questions - if Google can't answer your question, then I won't be able to. Having said that feel free to email me; although my work takes me off the grid a lot so please don't be offended if I don't reply in a hurry.